Adding Authentication

 Written byBernard Bado
- Published At
The authentication flow is managed using next-auth. The configuration can be found inside pages/api/auth[...nextauth].ts.
We've preconfigured the template to support Google and email authentication. In order to make these work, follow the instructions in individual sections.
Adding Authentication
Let's start by setting up Google Auth.
Adding Google Authentication
Go to Google Console and create a new project if you don't already have one.
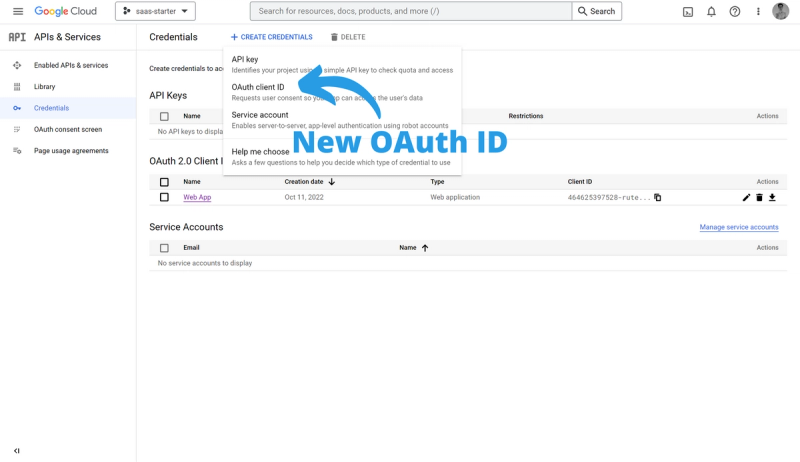
Now, we need to create an OAuth credential for the project.

Creating OAuth ID
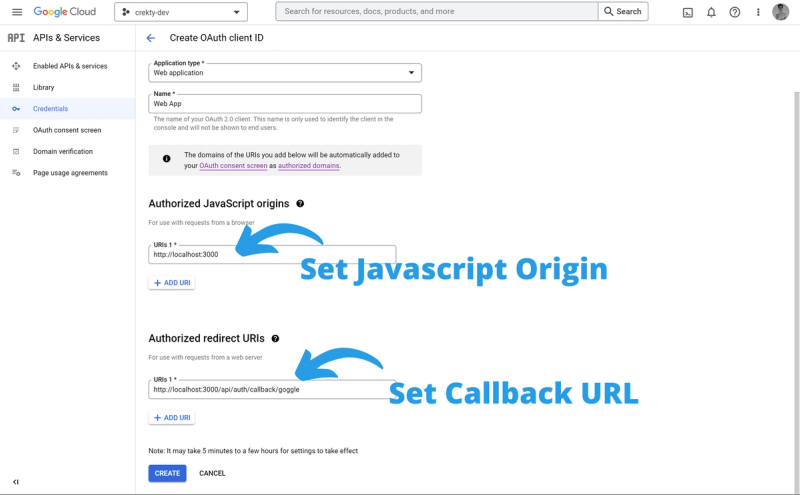
Once the credential is created, we need to set up an OAuth client properly.
- Add
http://localhost:3000to the list of JavaScript origins - Add
http://localhost:3000/api/auth/callback/googleto authorized redirect URIs

Setting up OAuth client
Once you save your changes, you'll be given the client ID and Secret. Store these values into .env.local inside the project directory.
Next Auth requires to create a random string used for signing secrets. Write one and store it inside .env.local as well.
Adding Email Authentication
To enable sign-in through e-mail, we need to use an SMTP email provider. The most popular options are SendInBlue or SendGrid.
Pick the SMTP provider of your choice, and once you have the credentials, add them inside .env.local file
EMAIL_SERVER_HOST=smtp-relay.sendinblue.comEMAIL_SERVER_PORT=587EMAIL_SERVER_USER=bado.bernard94@gmail.comEMAIL_SERVER_PASSWORD=1************mEMAIL_FROM=bado.bernard94@gmail.com
If you set the credentials successfully, it's time to add the database.
Setting Up Database
In order to create users, we need to have a database.
The template is preconfigured to use PostgreSQL to persist the data, but you can also change it to other DB providers if you wish.
To set up a database, you need to have it running locally, or use the cloud instance of your choice.
Once you have the database up and running, copy the connection URL and paste it inside .env file.
It should look similar to this.
DATABASE_URL=postgres://bklorcl:34f2f60e0f@ec2-63-34-180-86.eu-west-1.compute.amazonaws.com:5432/sahk
To initialize the database, run yarn db:push or npm run db:push.
This will generate a database client and initializes the schema.
You can now try to sign up for your newly bootstrapped SaaS.
Authentication Providers
To learn more about authentication providers, take a look at the official documentation.
Once you add/remove the providers, make sure to update the Sign In UI accordingly.
The UI component is located in features/sign-in directory.